Why You Should Learn to Build Your Own Stack
Managed services are great until the bill and the environments pile up. I'm starting a series on building your own stack — Terraform, Docker, CI, deploy — so you can stand up predictable, secure places to run the apps you're wiring together.
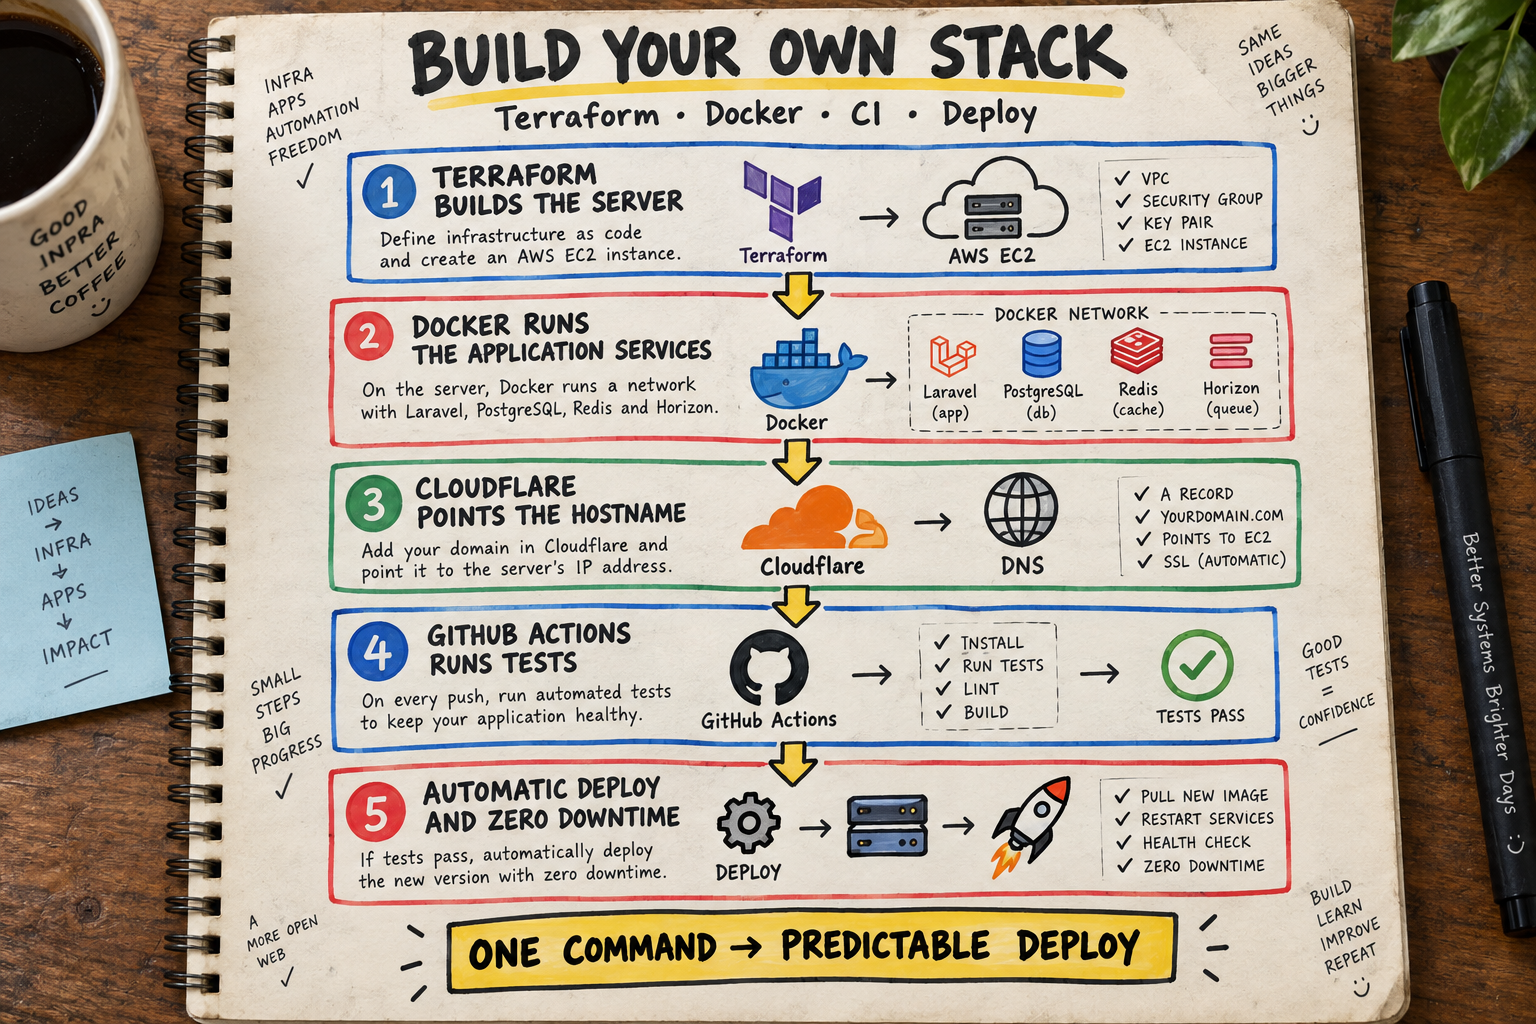
TLDR: I’m starting a series on how to self-host your own stack. By “stack” I mean the combination of resources that host your application — linux box, database, queue, storage, DNS, maybe a load balancer later. Services like Railway and Supabase are amazing. They also add up money wise and more importanlty knowing how to connect your intranet into managed agents and other systems is key. By the end of this first lesson we’ll have one command that builds a classic stack you can deploy to: infrastructure as code, CI after tests, automatic deploy, zero downtime, no clickOps.
This is post one in a series: how to self-host your own stack.
Why learning to build your own stack matters
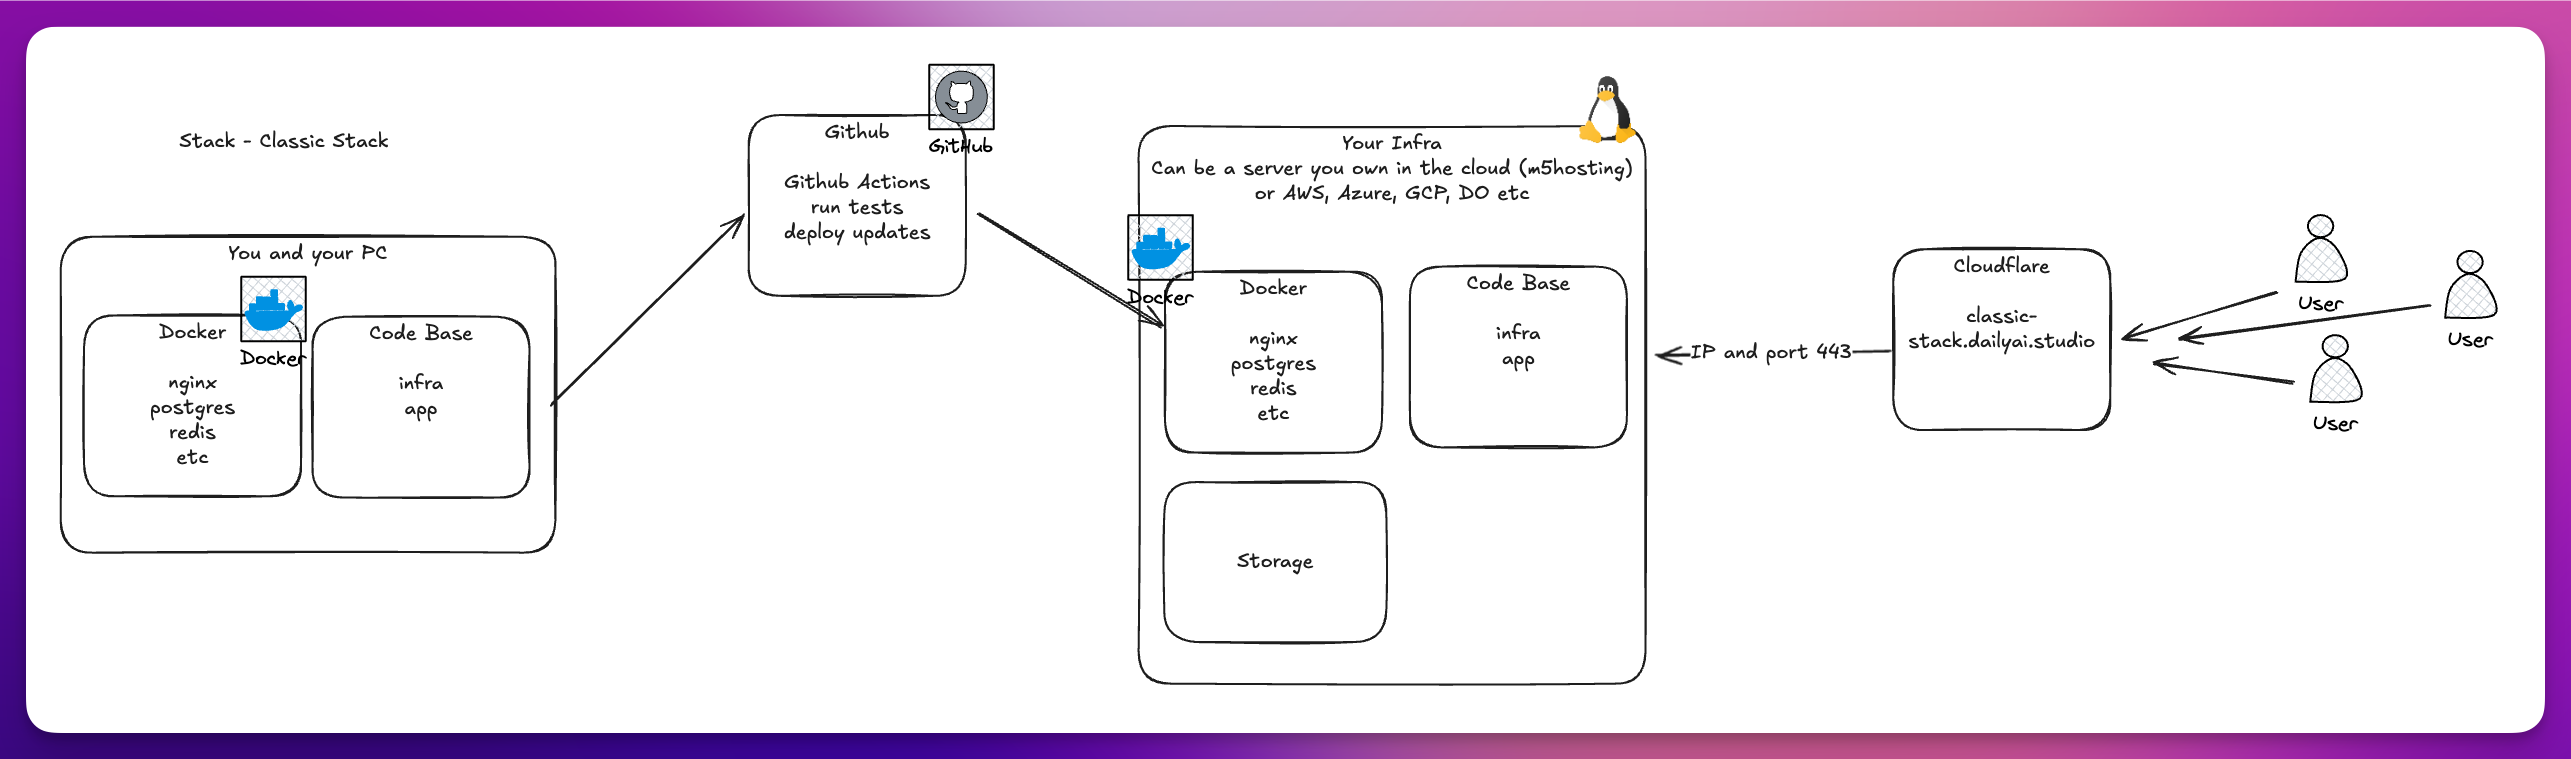
NOTE: if you get stuck just chat with the code base. Open up Claude or Codex or whatever and just ask your question
I use services like Railway and Supabase and I might use a queue system like Redis etc. Later on maybe a load balancer. Storage, authentication, websockets — a lot of that I get out of Supabase but running your own Supabase can be a lot.
These are amazing services. They can also add up. Supabase isn’t free after your first few stacks. And when building the company intranet with multiple environments it will add up.
So how do we use tools like Terraform (and later Kubernetes) to quickly stand up what I call different types of stacks — that combination of resources — with predictable pricing? And then how do we get our code there easily.
This matters even more as we try to integrate all these other systems together. For example Claude Managed Agents might need to access a file on your storage area, or a service. Containers are key too so you can keep them more up to date and scale. Even if you go back to Vercel + Supabase + GitHub Actions etc it is still great to know these things.
What I mean by stack (and what this series is not)
This isn’t going to be about Stripe integration and things like that. This is more for intranet applications that you’re building for internal business use.
When we deploy these stacks, we start simple.
The first one is a simple Terraform command that builds up our stack on AWS (later Azure and Google Cloud). What we end up with is a very predictable pricing stack.
You could go a couple of ways: dedicated databases, dedicated queue systems from the cloud. Or we can just use something like an EC2 — a Linux box basically. We’ll try a whole bunch of them. Every cloud provider. Later I will start to use Kubernetes to more easily manage the running services and scale as needed.
By the time we’re done with this first lesson, we’re going to have one command, and we’re going to build a system we can deploy to.
Classic path:
- Infrastructure as code
- CI — continuously pushing code and integrating it after tests into our trunk
- Automatically deploy to that system
I will have trainings videos on all of this. First we build the stack. Then we enjoy deploying to the stack by pushing the code there.
We’ll have zero downtime during the deployments. Migrations with basically no touch. No need to click. No clickOps. All infrastructure as code.
Why Docker
We’re going to use Docker. It’s just amazing because we can run these locally, mess around locally, see our stuff working, and then deploy it. Even more importantly: we just won’t care as much when our Linux box is out of date. We can update it without worrying about breaking our application or the queue system or whatever.
This is going to be a stack based on Laravel to start, Postres as the database, Redis for queueing, and storage will be a “volume” we can backup and share as needed. Horizon so we can do queue jobs for us. GitHub actions will do all the Continuas Integration and Deployment, migrations will be in code.
Later on we’ll get into Kubernetes. Right now I’m just trying to keep it simple. I want to grow through this together — and I mean grow, because we’re going to be learning and changing and doing. AI ops is fun again, in my opinion.
Yes, you’ll need to know some basic Linux stuff. Don’t worry about it. You always have AI to help out. It can be wrong. It’s still amazing. You might get stuck on SSH. Ask AI. Or ask below - I’ll try to help you.
Where is the code
The code’s all on GitHub. When you pull it down you can run your Terraform in it to get going and set up the infrastructure requirements. Kind of like npm init — hey, give me what I need to run this.
We’ll focus first on an AWS system but again we will do Azure, GCP and maybe some others
Build it (the short version for this draft)
This repo will have the code. https://github.com/alnutile/labs you can:
Then follow the labs/classic-stack/README.md
Read the script files to just see how things come together
This will get your docker running with the php and other elements needed for the initial web application.
Yes Laraval has Sail but I want to really show and see how this works so we can later move into Kubernetes etc. Keep in mind this is about hosting your own stack, any type.
The labs/classic-stack/README.md also notes
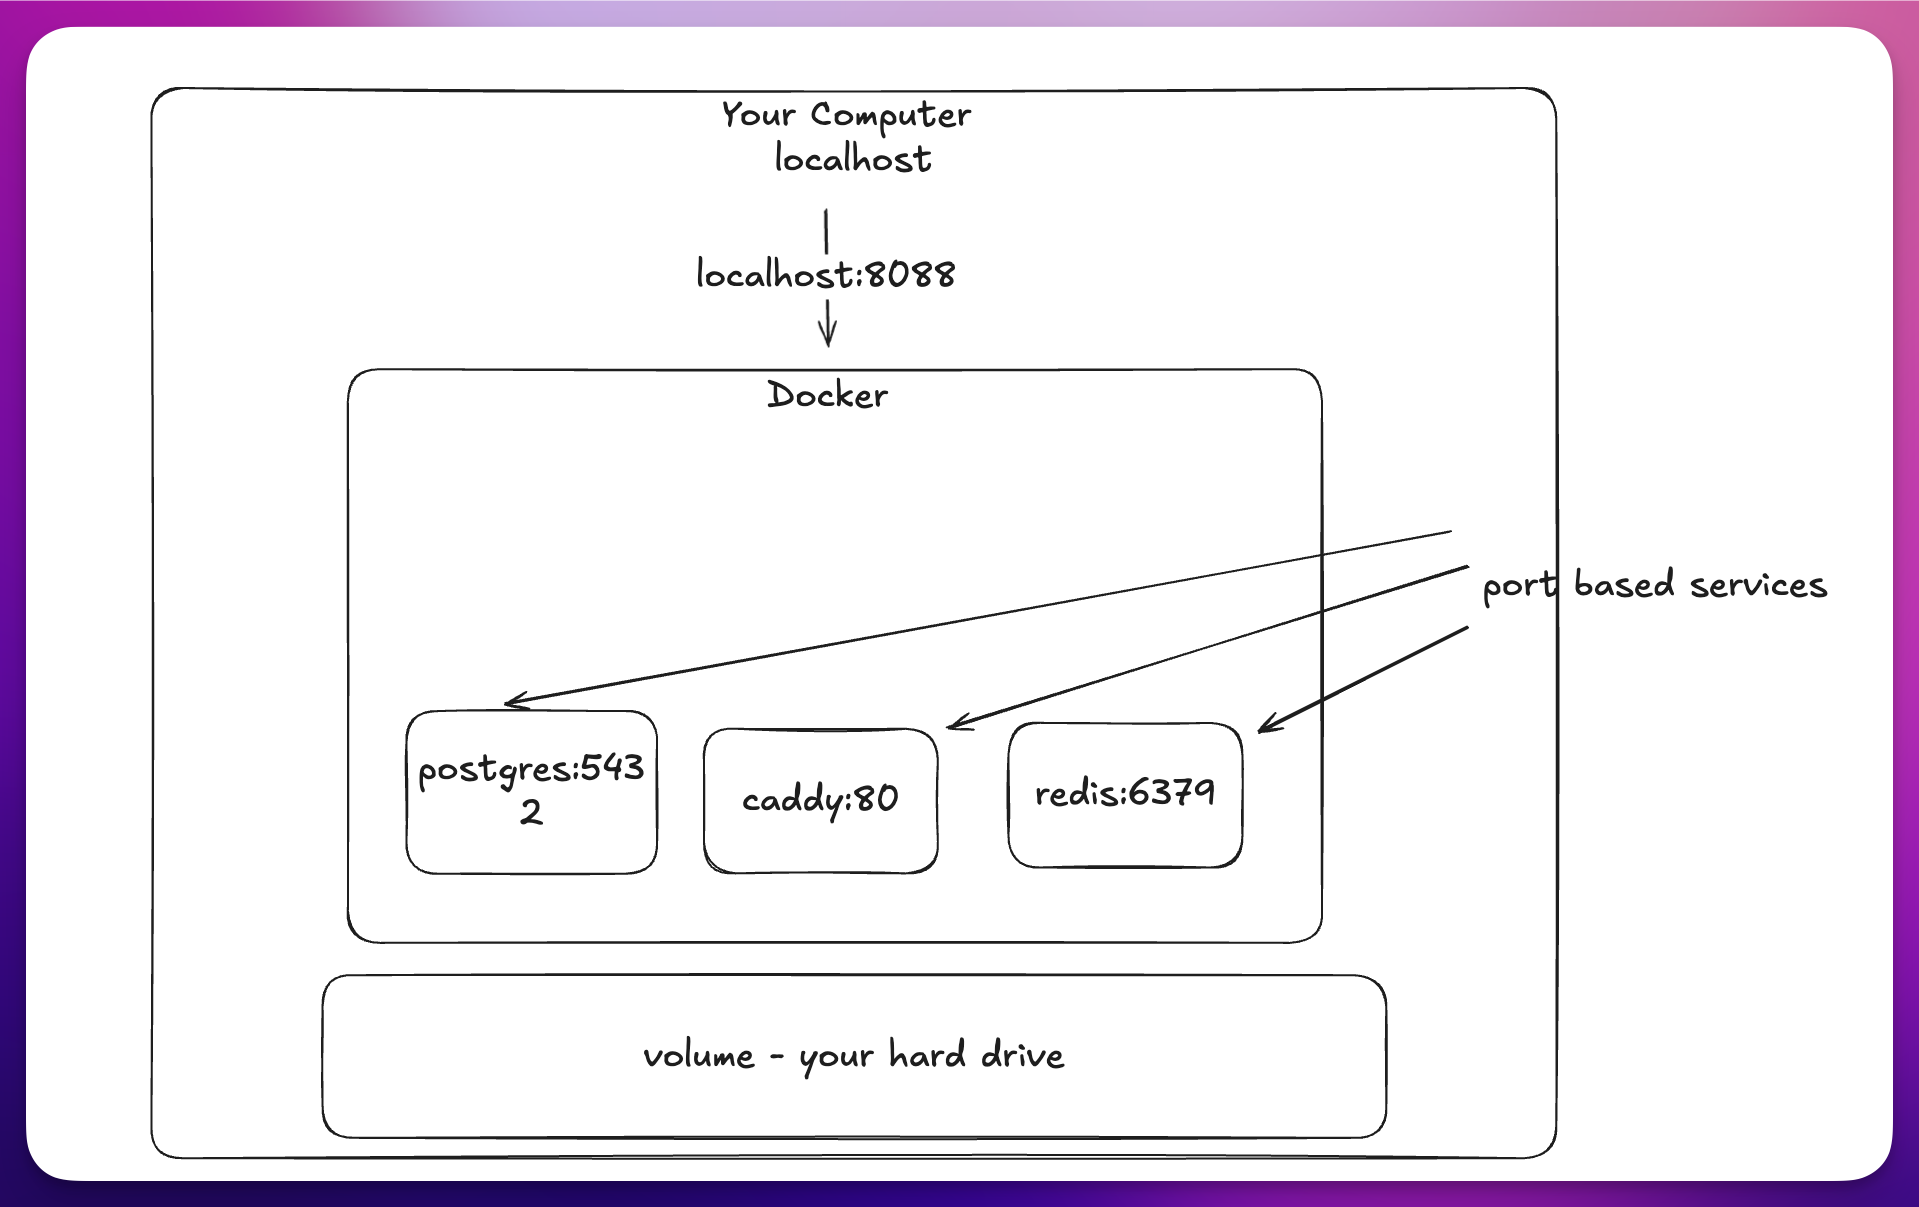
Local PostgreSQL/Redis use named volumes with no published database ports. The source and local reports are in
app/; production reports use a separate persistent volume.app/.envis ignored. To change the local web port, setAPP_PORTandAPP_URLthere.down -vdeletes the local database and queue volumes.
This is pretty neat since docker can talk to other services running in it’s own internal network.
Building the Server
Ok now the README.md will cover this part and it starts off with:
PRICING:
The first version costs roughly $22 per month before taxes and optional backups when left running continuously in AWS us-west-2. That includes one small EC2 instance, a 30 GB encrypted gp3 disk, and one public IPv4 address. PostgreSQL, Redis, Horizon, Caddy, and Laravel all run as containers on that same machine, so they do not create separate service charges.
This is an estimate, not a fixed bill. Data transfer, snapshots, extra storage, CPU- credit usage, Cloudflare features, and domain registration can add to it. Stopping or destroying the instance reduces compute costs, but the disk, snapshots, and public IP may still incur charges depending on what remains.
$22 USD might seem high but what will happen shortly is we can run as many applications we want on this. Or use a smaller instance etc. This is a fixed cost that will not go up until the machine is maxed out which you will see can hold more than you think.
export AWS_PROFILE=sundance        # replace with your profile
aws sts get-caller-identity
ssh-keygen -t ed25519 -f ~/.ssh/classic-stack-deploy -C classic-stack-deploy
cd terraform
cp terraform.tfvars.example terraform.tfvars
Since at this point we want to make sure we can get into the server after.
If you get stuck in a terminal sceen try pressing “q”
And when it asks for a passphrase just click “Return” since none is needed.
You will need your public ip try this:
Run curl -4 https://api.ipify.org to find the public IPv4 address AWS will see. Add /32 because only that single address should be allowed to SSH into the server. Don’t use your local Wi-Fi address, and don’t open SSH to 0.0.0.0/0. If you’re using a VPN or your ISP changes your address, run the command again and update Terraform.
To get your SSH key into your clipboard do:
cat ~/.ssh/classic-stack-deploy.pub | pbcopy
Deploy from Github
Once the server is running, the deployment path becomes simple:
pull request
    ↓
tests against PostgreSQL and Redis
    ↓
Docker image build
    ↓
push to main
    ↓
temporary SSH access for the GitHub runner
    ↓
upload the release to EC2
    ↓
run migrations and health checks
    ↓
switch the running application
The GitHub Actions workflow lives at the repository root in .github/workflows/classic- stack.yml.
Every pull request runs the application tests, Laravel Pint, a real Redis and Horizon queue check, and a production Docker image build. A push to main follows the same path. After the tests pass, the deployment job uploads the exact image that was tested.
The workflow uses GitHub’s OIDC connection to AWS, so there is no long-lived AWS access key stored in GitHub. AWS trusts only this repository’s production environment. During deployment, the workflow discovers the runner’s current public IP and temporarily adds that single /32 address to a dedicated SSH security group. The rule is removed when the job finishes.
The deployment connects using a dedicated deploy SSH key. It uploads an immutable release directory containing the Docker image and deployment files. On the server, the release script:
- Starts PostgreSQL and Redis.
- Runs Laravel migrations.
- Starts the new application container.
- Checks that the application can reach PostgreSQL and Redis.
- Starts the new Horizon and scheduler processes.
- Reloads Caddy with the new application upstream.
- Drains and stops the previous application container.
NOTE: as you follow the README in the code base commands like STACK_HOST=$(terraform -chdir=terraform output -raw elastic_ip) is how you set a variable in the terminal. But if you change terminals that variable is gone.
The result is a controlled deployment without a planned web outage. The previous release remains available for rollback, and the current and previous symlinks show which releases are active.
This is near-zero-downtime deployment on one server. It is not high availability. A failed EC2 host, a full disk, an incompatible database migration, or a bad infrastructure change still affects the application. Database migrations must remain compatible with both the old and new application versions while traffic moves between them.
After the initial setup, deploying an update is simply:
git add .
git commit -m "Update the application"
git push origin main
GitHub runs the tests first. Only a successful run is allowed to deploy.
CloudFlare
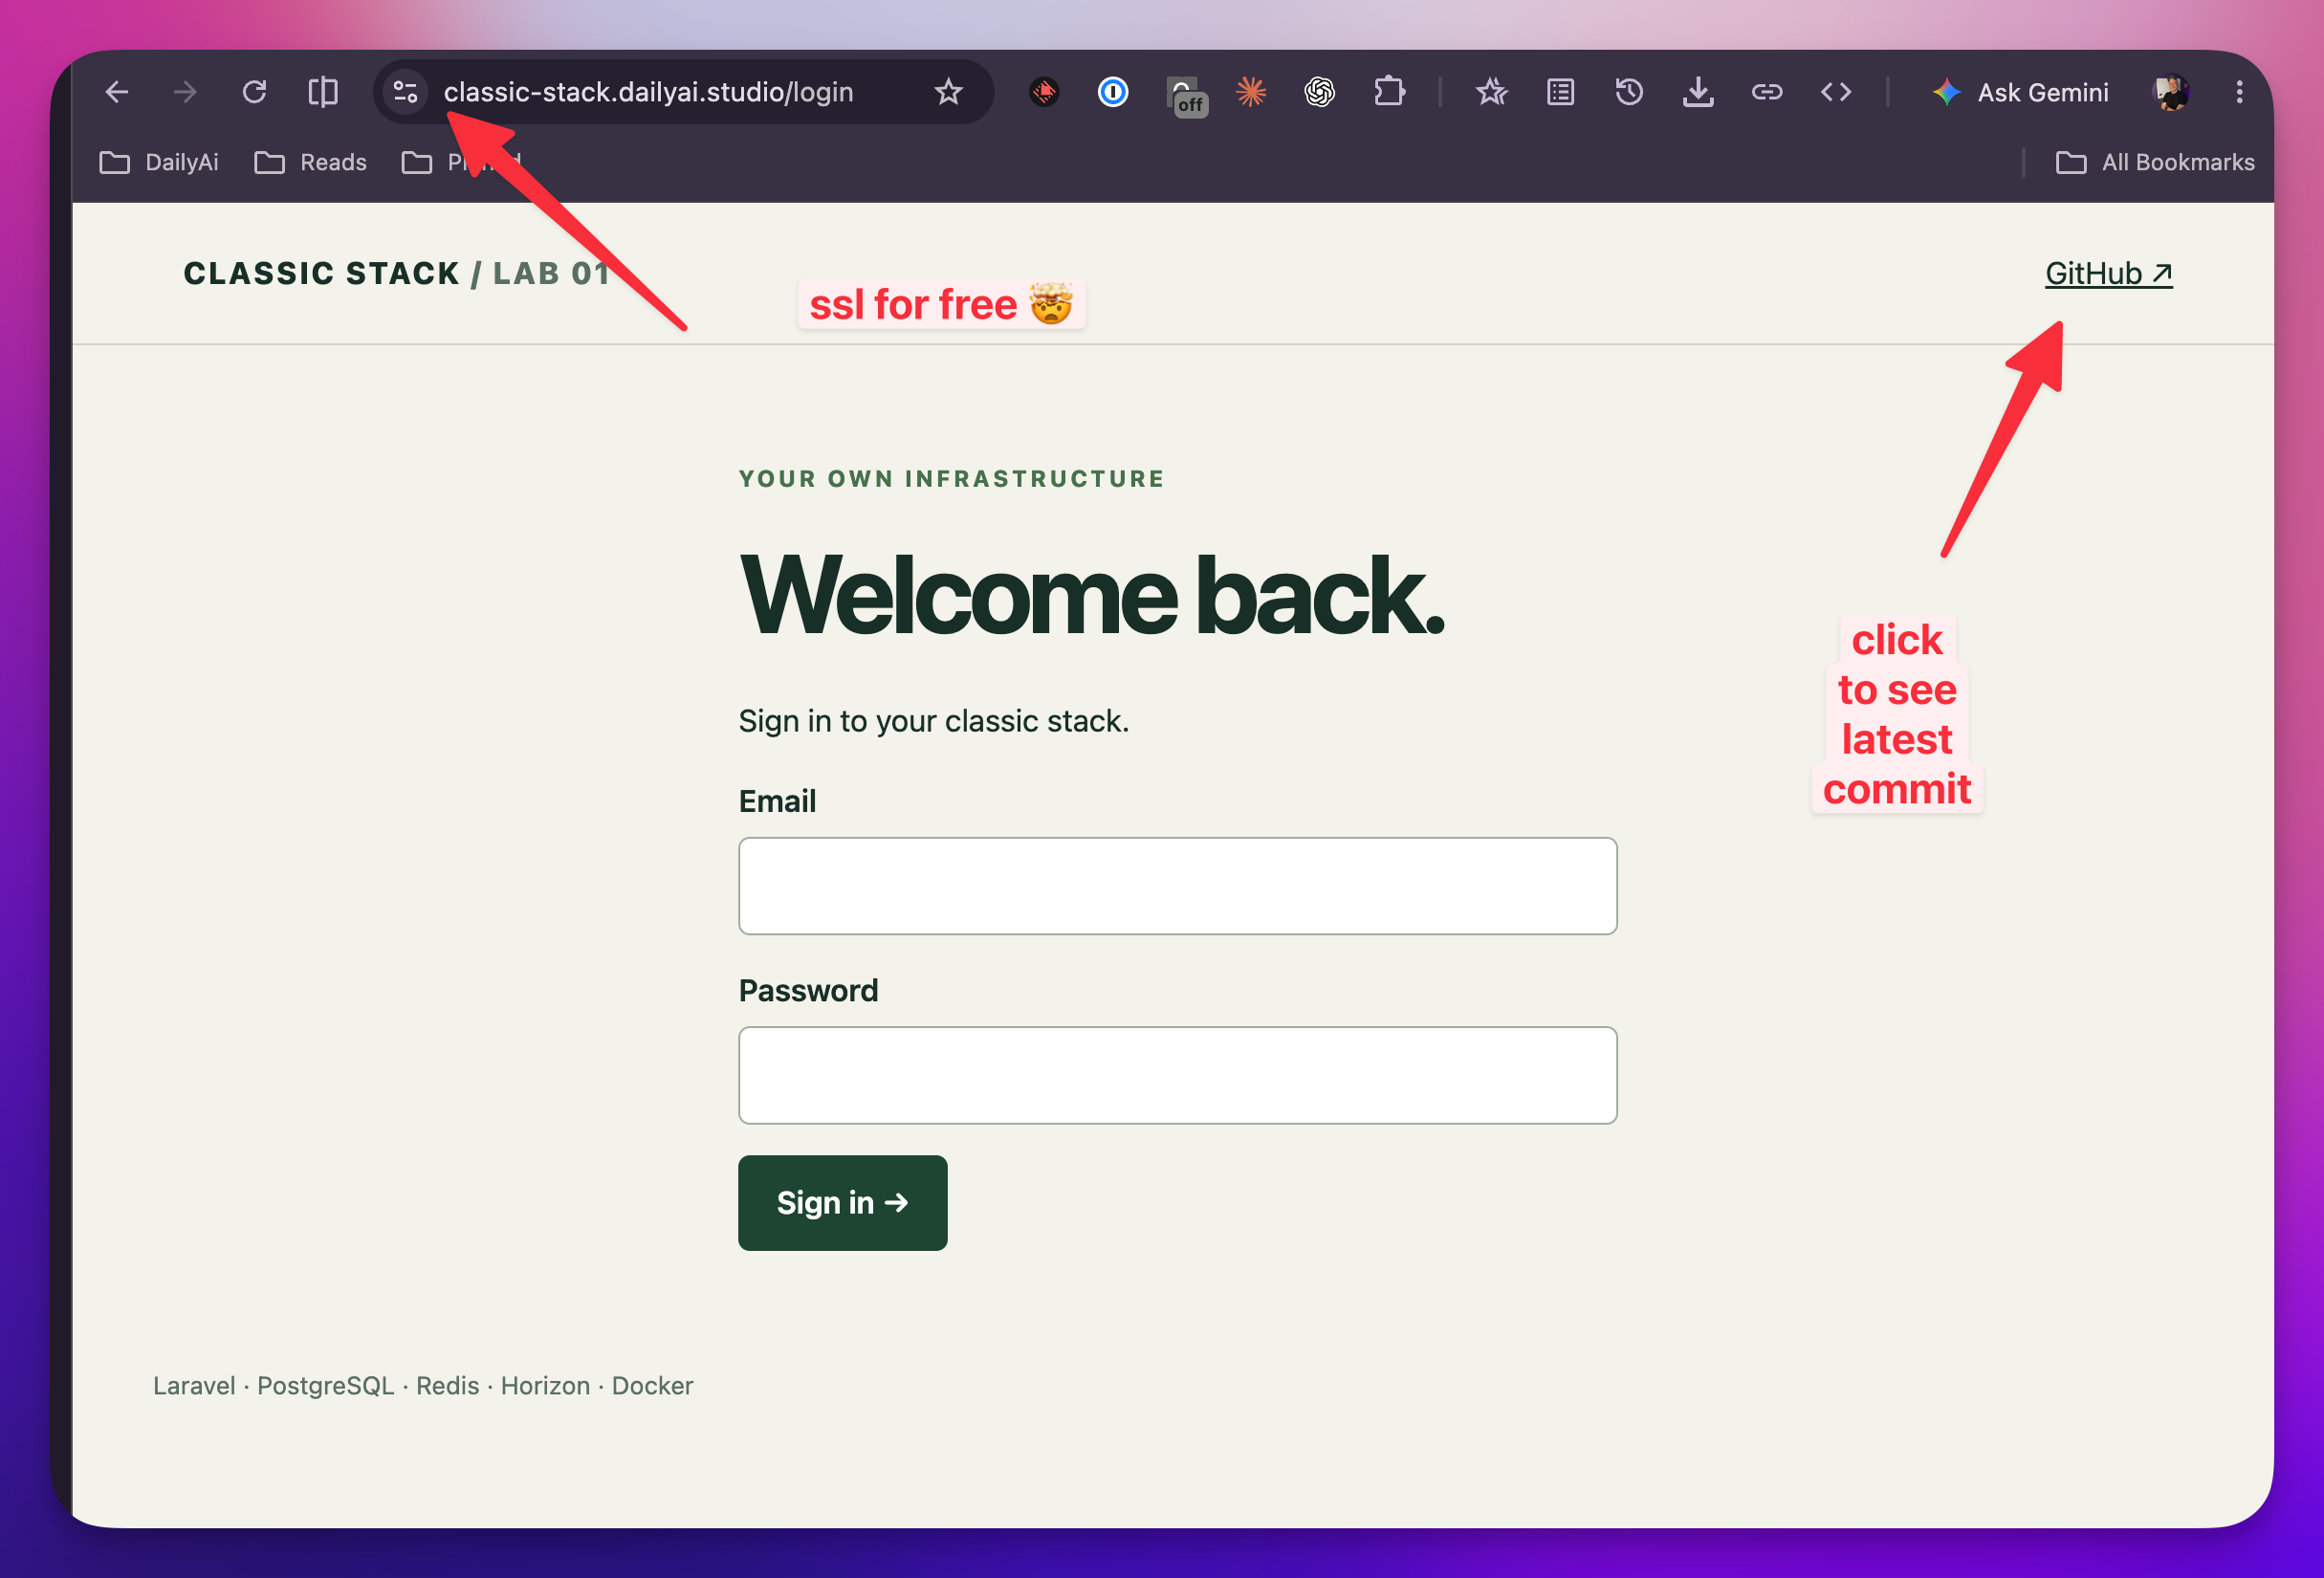
The hostname for this stack is classic-stack.dailyai.studio. Rather than clicking a DNS
record into existence, Terraform manages the record alongside the AWS infrastructure.
The Cloudflare provider uses a narrowly scoped API token with Zone / DNS / Edit permission:
printf 'Cloudflare token: '
read -rs CLOUDFLARE_API_TOKEN
echo

export TF_VAR_cloudflare_api_token="$CLOUDFLARE_API_TOKEN"

terraform -chdir=terraform plan -out classic-stack-with-dns.tfplan
terraform -chdir=terraform apply classic-stack-with-dns.tfplan

unset TF_VAR_cloudflare_api_token CLOUDFLARE_API_TOKEN
The Terraform resource is deliberately DNS-only while the server is coming online:
resource "cloudflare_record" "classic_stack" {
count = local.cloudflare_enabled ? 1 : 0

zone_id = data.cloudflare_zone.classic_stack[0].id
name    = var.cloudflare_record_name
type    = "A"
value   = aws_eip.classic_stack.public_ip
ttl     = 1
proxied = var.cloudflare_record_proxied
}
DNS-only lets Caddy obtain the origin certificate directly. After HTTPS works, Cloudflare proxying can be enabled with cloudflare_record_proxied = true. When proxying, use Full (strict) SSL/TLS.
If the record already exists, import it into Terraform state before applying the plan. That turns the existing dashboard record into an infrastructure-as-code resource instead of creating a duplicate.
Make a User and Check it out
Registration is disabled in production, so create the first account over SSH:
ssh -i ~/.ssh/classic-stack-deploy \
deploy@$(terraform -chdir=terraform output -raw elastic_ip)
Then run this on the server:
export APP_ROOT=/home/deploy/apps/classic-stack
export RELEASE_ID=$(basename "$(readlink "$APP_ROOT/current")")


cd "$APP_ROOT/current"

docker compose \
--env-file "$APP_ROOT/shared/env/production.env" \
-p "release-$RELEASE_ID" \
-f deploy/compose.release.yaml \
exec --user www-data app \
php artisan stack:user you@example.com --name="Your Name"
Laravel will prompt for a password without echoing it. Add that same email to HORIZON_ALLOWED_EMAILS if the user should access /horizon.
Whats Next
Now lets make this computer really pay for itself. In the next post will will host 10 applications and put a payload on them. Video coming soon!
Frequently asked questions
- What do you mean by a stack in this series?
- The combination of resources that host your application — compute, database, queue, storage, DNS, and maybe a load balancer later. Not every SaaS bolt-on like Stripe. More the place your internal or office apps actually run.
- Why build your own stack instead of using Railway or Supabase?
- Those services are amazing. They also add up once you have a lot of ideas, multiple environments, or you are building something like an internet of apps. Building your own stack with tools like Terraform gives you predictable pricing and a place you control when you start wiring other systems in.
- Why does this matter for integrating other systems and AI agents?
- When cloud-managed agents or third-party services need to talk into your AWS or other cloud setup, you need secure networking and a clear target. Containers help you keep things updated and scale. That pays off when you understand the stack underneath instead of only clicking through managed dashboards.
- What is the classic stack in this first lesson?
- A Linux box with Docker: Laravel for the app, Redis and Horizon for queues, Postgres with migrations, and storage on volumes so uploads survive deploys. Terraform stands it up. GitHub runs tests and deploys with zero downtime and no clickOps.
- Are you using RDS, SQS, and S3 in this first lesson?
- No. This first lesson is just a Linux box — which is what a lot of managed services are underneath anyway. Dedicated cloud databases, queues, and object storage are options later. The next article covers hosting multiple apps on one box.
- Do I need to be a Linux expert to follow along?
- You need some basic Linux, including things like SSH. Do not panic about it. AI can help, even when it is wrong, and you can ask questions on the post. The goal is to grow through this together, not to assume you already know every command.